Tips & Tricks
After working with so many customers, there are a number of things that seem to crop up over and over with certain repairs. So we can help you better, we have designed this tips and tricks section which will be updated regularly with useful tips and tutorials for you.
If you have an suggestions or specific topics you would like us to cover, please get in touch and let us know.
|
|
|
Download of The Month
AVG is great at keeping your computer virus free and protected and can be upgraded for even more great features.

|
|
Adding New Users in Windows 7
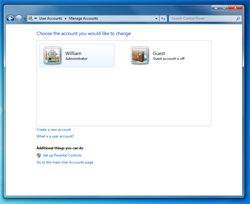
If like most people, you are not the only user of your desktop PC, you might find it useful to have your own space to work in. Your desktop, web browser and personal files can all be kept safe and private and you can tailor them to suit your needs.
1 Click on the start menu in the bottom left corner of the screen. Now look for the 'Control Panel' option and click on it. This will open a new window.
2 Once you have opened the control panel, you will need to be in category view to follow the rest of this tutorial. In the top right hand corner of the control panel you will see 'view by:'. Next to it should say 'Category'. If it doesn't, click on it and change it.
3 Now look for the heading 'User Accounts and Family Safety'. Under that you will see the option to 'Add or Remover User Accounts' - click on it.
4 You should now be looking at the icons which represent each of the users on your computer. From here you can add a new user by clicking 'Create a New Account'
5 Type in the name off the account in the appropriate box and then click 'create account' at the bottom right of the box. Now when you start up your PC, you will see the new user is added to the startup screen and you can choose which user you want to log in as.
Installing a Printer in Windows 7
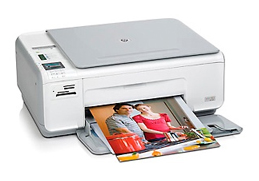
Installing a printer can be a daunting process, especially for those who are new to computers or don't really understand the more complex settings in Windows. We're going to show you how simple it can be to install a printer.
1 Click on the start menu in the bottom left corner of the screen. Now look for the 'Control Panel' option and click on it.
2 You will now see a new windows appear with lots of options. You will need to select 'view by' in the top right corner of this window and change it to 'large icons' if it isn't already. This will make the rest of the process a little easier to explain.
3 Now look for the icon labeled 'Devices and Printers' and click on it. After a short time you should see a new windows with more icons and options. Look for 'Add a Printer' and select it.
4 Select the 'Add a network printer...' option and wait for the list to show your printer. If it isn't there, you will need to make sure your printer is connected to the same network that your PC is (or give us a call).
5 Finally select the printer you wish to install and follow the rest of the instructions on the screen. Once installed you can print a test sheet to ensure your computer is connected to the printer and the printer is working correctly.
Using Your Laptop Correctly!
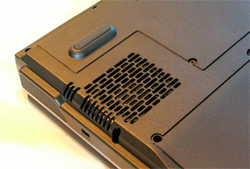
Many people prefer the laptop due to its light weight and mobility, you can literally use it anywhere. But the problem with laptops is that they are very inappropriately named. Using a laptop on your lap like you would expect to, is quite dangerous because usually the vents for the fans are located on the bottom of the machine.
The fans draw in air from the bottom of the laptop to cool down the components and then it expels the air through the back of the machine. This works particularly well when the laptop is used on a hard flat surface, but repeated use of the laptop on your knee will stop air from getting into the vents and could cause it to overheat.
The other main problem with this is that the lint and dust on your clothes will also be picked up from the suction created by the fans. This gets trapped in the exhaust vent and when it becomes blocked, its very difficult for the laptop to get rid of the warm air that circulates through the machine.
The best way to use a laptop is to have it on a hard, flat surface such as a desk and avoid when possible using it on any soft furnishings, carpets or clothing. As always, we offer a £30 hardware service which will clean the inside of your computer and ensure you have no hardware issues. Give us a call today to book your appointment.
Starting up in Safe Mode
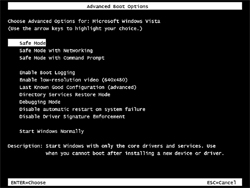
Safe mode in windows is a way of starting your computer using only the very basic windows componants. It is used to help diagnose and resolve a number of windows issues. The only downside is that your graphics processor and many other usefull devices and drivers are disabled during this time. Which means it wont look as good and some of your regular software might have issues running.
1 Shut down your computer and get ready on the F8 key, turn the computer on and after you see something appear on screen, start pressing the F8 key.
2 Once you see advanced boot options screen, you can either select 'Safe Mode' to start in safe mode or 'Safe Mode with Networking' to allow internet access in safe mode.
3 You will now see a list of files appear, don't worry about that, just wait until its complete. Once windows has loaded you will be asked if you want to continue, click on 'yes' and your now looking at windows in safe mode.
4 You can now attempt to solve your issue but if your still having the same problem chances are its a little more serious and you will need to have it repaired by a professional. Give us a call and we will help you out.
Cleaning Up Your Computer with Ccleaner
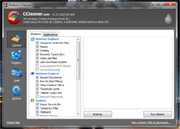
CCleaner is a software cleaning tool which can be used in a number of ways to help maintain your computers speed and efficiency. Here we will give you a basic run down on how to use it.
Please be aware that incorrect use of this software could lead to damage to your file system or even loss of useful files. Do not continue unless you are confident with restoring your computer should any issues arise.
1 First you will need to download and install ccleaner. Once complete, close any other programs and save anything you have been working on.
2 Open CCleaner and make sure your in the 'Cleaner' section of the software which should load by default. Click 'Analyze' at the bottom and wait for the scan to complete. This may take a few minutes.
3 When the scan reaches 100%, press 'Run Cleaner' and click ok to the dialog box which subsequently appears. This will clean out any temporary files and is the first step to keeping your computer clean.
4 If you would like to continue you can do the same again in the registry section to clean out the registry of any unwanted or junk files. It is usually a good idea to save a backup of the registry in case anything goes wrong so when you are asked, you should do so.
How to Backup your files
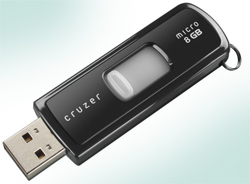
One common thing people forget to do regularly is to back up their data, and that can lead to data loss if your hard drive suddenly fails. Here's a quick tutorial to show you how you can backup your data to a flash drive or external hard drive.
1 Locate the files on your computer you wish to backup. These may be pictures, documents, music or anything your wish.
2 Select the items and copy them by clicking on them with the right mouse button and pressing 'copy'. Its usually easier to copy a folder such as 'My Pictures' rather than selecting individual files.
3 Insert your flash drive or USB hard drive into a free USB port on your computer and wait for the Auto Play box to appear. When it does, select 'Open folder to view files' and wait for a moment.
4 When the folder appears on the screen, find some white space in the main windows and right click on the mouse button. From the menu which appears, click on 'Paste' and wait for the files to copy.
5 Finally you will need to eject your USB drive to safely remove it. Look for an icon in the lower right corner of the screen which says 'Safely remove Hardware' and click on it. Alternatively you can do this in 'My Computer' by right clicking on the memory stick and selecting 'eject'.
Scanning For Viruses with AVG 2013
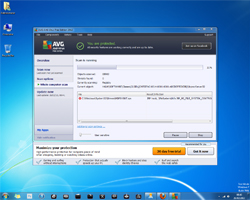
From time to time we can all download a file or visit a web page which which might have been infected with a virus, and this can cause some adverse effects. To ensure your system is clean and free from viruses, follow these simple steps.
1 Click on the AVG icon in the lower right corner of the screen. If its not there, click on the small white arrow and you will see the hidden icons. AVG should be there.
2 Now look for the button which says 'scan now'. Pressing this will start a scan of your system and can take quite some time. Its best to leave the computer while it scans for viruses.
3 Once the scan is complete you will either be given the 'all clear' and can close AVG, or you will need to address some issues. If you are not sure what to do from here, give us a call and we can help.
Please note that following the next step may lead to problems with other software if any major files are infected - you may have to reinstall software, drivers or important windows components. In this case we cannot take responsibility for any problems that may arise from following this guide. If you are unsure, contact us and we can help!
4 (Advanced users only) Look for any issues which have not been removed or healed (under the red cross), and click on the heading to the left. Now select 'remove all unhealed' in the bottom right corner to remove any infected files. Follow the instructions on screen to complete the removal.
Uninstalling a Program
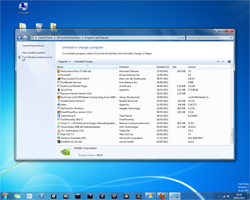
In windows, your computer can become cluttered with software which you no longer use, and that can slow things down a little. Uninstalling a program you no longer use a great way to keep your computer clean.
1 Click on the start menu in the bottom left corner, and select 'control panel'. If your in category view, select 'uninstall a program', otherwise your looking for 'programs and features'.
2 Now use the scroll bar to the right to find the program you want to remove and click on it. When the program is highlighted, click on 'Uninstall/Change' at the top.
3 From here, the process is very different depending on the software your removing, but if you follow the on screen instructions carefully, you can't go far wrong.
Keep it cool!
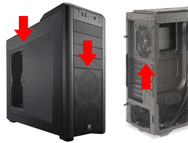
For those who have a desktop computer tucked in the corner of the office / dining room / bedroom etc, this is for you!
Check to see where the vents are on your computer's case and make sure there is nothing to stop the air getting in or out. It is very important to keep your computer running as cool as possible to maintain a healthy system, any obstacles blocking the air vents will reduce airflow inside your computer allowing heat to build up inside - which is a bad thing!
Its also a good idea to make sure there is no dust inside the case and thus having a hardware service once a year is recommended.